Showing posts with label planting. Show all posts
Showing posts with label planting. Show all posts
Boom

The garden exploded this weekend. Some rain and a couple of 90ish degree days were just what we needed to push past spring seedling-hood into early summer growth spurts. The tomato plants are bigger every time I go outside, and the raspberries and grapes are wildly taking over their parts of the backyard.

One of my tactics of gardening is to plant a large variety of plants knowing that not everything will turn out in a given year. Weather and pest pressure can make big differences and a crop that normally performs great may have a lackluster year, or a novelty item you grow for fun may turn out to be your best harvest. There's a few standbys I need to do well every season (tomatoes, peppers, garlic, onions) but the supporting roles help mix things up. This year I had terrible germination on spinach and peas. I had a few small patches do okay in the hoop house, but it wasn't the spring of planning every meal around spinach. I did have a fantastic bok choy crop, which was an afterthought planting in a little bed where my eggplants would eventually fill in. This led to lots of fun experimental side dishes and a nice batch of kimchi. I replanted my pea patch with Christmas Lima beans to cut my losses, and we'll just snack on what we do get (if the pea-loving hound does not find them all first).

I'm trying a 3-sisters bed this season: we haven't grown corn in years as it takes up a lot of room and oftentimes gets eaten by squirrels--plus fantastic sweet corn is readily available from local folks. But, I thought I'd try a rainbow dent corn this year, so I'm imitating a raised bed design I found online with four blocks of corn inter-planted with bush delicata squash and cranberry pole beans. We'll see how it goes!

Yesterday the late evening sun hit the yard after a long day and everything was bathed in a cornball golden and flattering light. I had a mini-revelation: Oh yeah, this is what the hard work is for. We take on a lot, we tackle big projects and do a ton of things ourselves from scratch, and the rewards, usually (hopefully?), are proportionate to all that effort. Sometimes when you're focusing on a long to-do list you forget to step back and look at the big picture!

A successful garlic experiment
Last year I was a wee bit short of garlic. I ended up with 80ish heads, when our goal is generally closer to 100+. I couple of things contributed to this--obviously I didn't quite plant enough bulbs--but also I had purchased a few "fancy" types from the market to diversify my crop a bit, and NONE of them survived the winter. Lesson learned. Also: our pickle production has been HUGE the last few years, and I forget how much garlic you use in every batch.There was a bit of hoarding and skimping of garlic over the winter--I had resigned myself for buying garlic for the first time in YEARS, but we actually made it thanks to a hefty load of scape pesto in the freezer. We limped along until this year's scape harvest, and I've been nicking a few baby green garlics out of the garden here and there.

Anyway, last fall's planting had a little more pressure to get it right. I had to walk a balance of saving enough for planting, and having enough to mostly get us through the winter. Then I had this idea. There was a "plant". A sort of chive, sort of not, at the end of one of my beds. I realized somewhere along the line it was a garlic that I had missed one year, and it just kept coming up, making tasty snippings for dinner, and then teeny tiny little scape heads in June. So I kept it, as kind of a volunteer pet plant (other people have these right? That weird arugula patch growing in your pepper patch you just can't stand to pull?

So last year, we revamped that little bed for strawberries, and I dug that sucker up. TONS and TONS of tiny garlc bulbs. I wish I had taken a picture. It was like a little garlic factory. SO, this was my secret weapon last fall. I planted half of my bed (about 75 bulbs) with big fat mature garlic from the last season's harvest. The second half was chock full of wee baby bulbs. I figured, at worst, they'd be tiny but edible, or I could replant them again and build them up to a larger size in a year or two.

And they've done fantastic. They've been noticeably shorter than the main crop, but I've pulled a few for fresh eating over the last few weeks and they are a nice size. Today I lifted them all out and they are awesome. I will definitely be integrating these little troopers into my main crop. It looks like I may have harvested them a little late so they may not store all winter, but I'll definitely hang onto a few to plant this fall. I should note my main crop is just selected from an unknown variety--probably organic grocery store garlic--and they are dependable if not exciting. I am happy to have these little red-skinned cuties to add to the mix.

I'm totally going to cultivate a few intentionally neglected plants in my herb bed from now on. It's the perfect fall-back garlic to cover for a poor year. Meanwhile my "main crop" doesn't seem quite ready. They still have 6 green leaves and are just turning brown at the tips, so I'm leaving the rest for another week or so.

0-2 weeks to last frost(!) - Some tips on early spring planting
As is fairly normal for this time of year, we've had a rollercoaster of weather the past two weeks. When the temperature dropped into the forties with rain, most of my plants came back inside for an extended break, and I bunkered up as well.

Inside the hoop house, spring plants loved it though. They didn't get the rain, but the cool, grey days were perfect for spinach, salad greens and peas. This week I had to start adding support to the indoor peas, while their outdoor counterparts are all of an inch high.

But the pendulum swung back the other way this week, we're at nearly 70 degrees as I write. I semi-opened up the hoop this week--rolled up the sides and took out a few side panels that were getting in the way of my snap peas. For the most part, the plants inside now are tolerant to light frosts, and are less happy when the temperature climbs to 100+ degrees. Also, with the sides up I can install my gutters and take advantage of that rain!
Last week I was talking to a woman who works with local farmers, and she was saying that the window of opportunity for spring planting was frustratingly small this year. We'd have a couple of nice days, then lots of rain, and they couldn't get their tractors into the fields. It made me realize that home gardeners have an advantage for sneaking in early crops. Still, dealing with wet soil can be an issue. I have a couple of tricks:
1. Prep beds in the fall. I turn my compost piles in the fall, and give all available beds a nice layer of compost and a mulch of leaves. For beds that will have bedding plants, I don't have to do anything in the spring--just move some mulch out of the way, and plant. This is great for broccoli/cabbage and onions, who are often ready to plant when the weather is wetter. One note, I am observing some slug issues with the leaf-mulched beds where I did this, they apparently can also be cozy spots for critters to overwinter.

2. The 2-step turnover. I know the latest trend is minimal working of soil--a lot of folks go the no-till route, and some say not even to turn compost into the soil at all, just let the worms do the work. I've never had or used a tiller, but I do like to dig a bit in my garden. Sometimes I have late fall plantings that don't get fed before winter--I'll have a pile of compost on the side of a bed that needs distributing. And also, I confess, turning over soil with a shovel is a distinct pleasure for me. I love the physicality of the process, and the sight of bits of eggshells and mysterious half-composted bits, fat worms and thousand-legged bugs. I love how the robin follows me around, snatching treats when I turn my attention elsewhere for a minute. So despite the slight risk of bringing weed seeds to the surface, I still do a bit of shovel work.

3. The cheat. When I want to plant tiny, fine seeds (such as lettuce or carrots), or the ground is just too wet to work, I spread a little potting soil. In this spot, I had beds prepped for beans, but wanted to add a few rows of lettuce and arugula around the outside. I pulled back the mulch, and spread some leftover soil mix. In this case I recycled some empty (i.e. failed) pots from my seed starting extravaganza.

This works great for folks who use lasagna-style gardening, and have heavily mulched beds. It just gives the seeds a nice layer of fine soil to sprout in. It's also not likely to have weed seeds, which gives more delicate plants a nice head start. (Ahem, in my hoop house I spread some lovely fine sifted compost before planting carrots, and ended up with a cover crop of lambs-quarters, darnit!)
So here we go! There are currently no days below 44 in the Madison 7-day forecast, and I'm getting pretty optimistic that we are past a danger of a hard frost. I'm still waiting on planting my heat-loving peppers, eggplants, and tomatoes, and am holding off on cucumbers and melons. But, I did seed some beans yesterday, and my zucchinis as well. My fruit trees are getting ready to bloom, the grapes are breaking bud, and all the birds are telling me spring is here!
6 weeks to last frost: Gardeners, start your tomatoes!
Sorry I'm a little late on this one, but then again, so is the weather! We've had a crazy week which included some good news, some bad news, and these little guys, which are pretty distracting.

 |
| Sturdy Roma tomato: this is one of a few I started early to go in the hoop house. Confession: I also started my basil early. |
I don't have a ton to add about starting sets at this point, except to mention that if you have been seeding all along, this is the stage where you have the most work cut out for you. Learn from me: don't have 17 flats of plants to take care of(!!). But even with a few, you are watching the latest germinators, adjusting light heights, checking older plants for moisture levels, and maybe even hauling flats outside to get some real sun on some nice days (or if you have a cold frame or hoop, most days). But it's also the stage where you start to see the rewards of all that labor. Look at those sturdy plants! You can almost imagine your future garden beds filled with all these babies you started yourself.
 |
| Look at all those peppers! |

10 weeks to last frost (give or take) - how much to plant?

Depending on your variety and seed packet, eggplants and some hot peppers are sowed between 8-10 weeks. Last year these were slow starters for me, and although I have fresh seed for several of them I went ahead and started most of them on the early side of the range.
As these are heat-loving plants, and our house is at a chilly 60-something degrees, I wrestled my heat mat away from my home-brewing husband and put it under the flats to help with germination. As I'm cheap and only have one small mat, I stack flats, and rotate plants out as they sprout. Our bathroom is also for some reason the warmest room in the house (plus bonus humidity!) so I've used that in the past-- there are lots of other low-tech options for boosting heat.

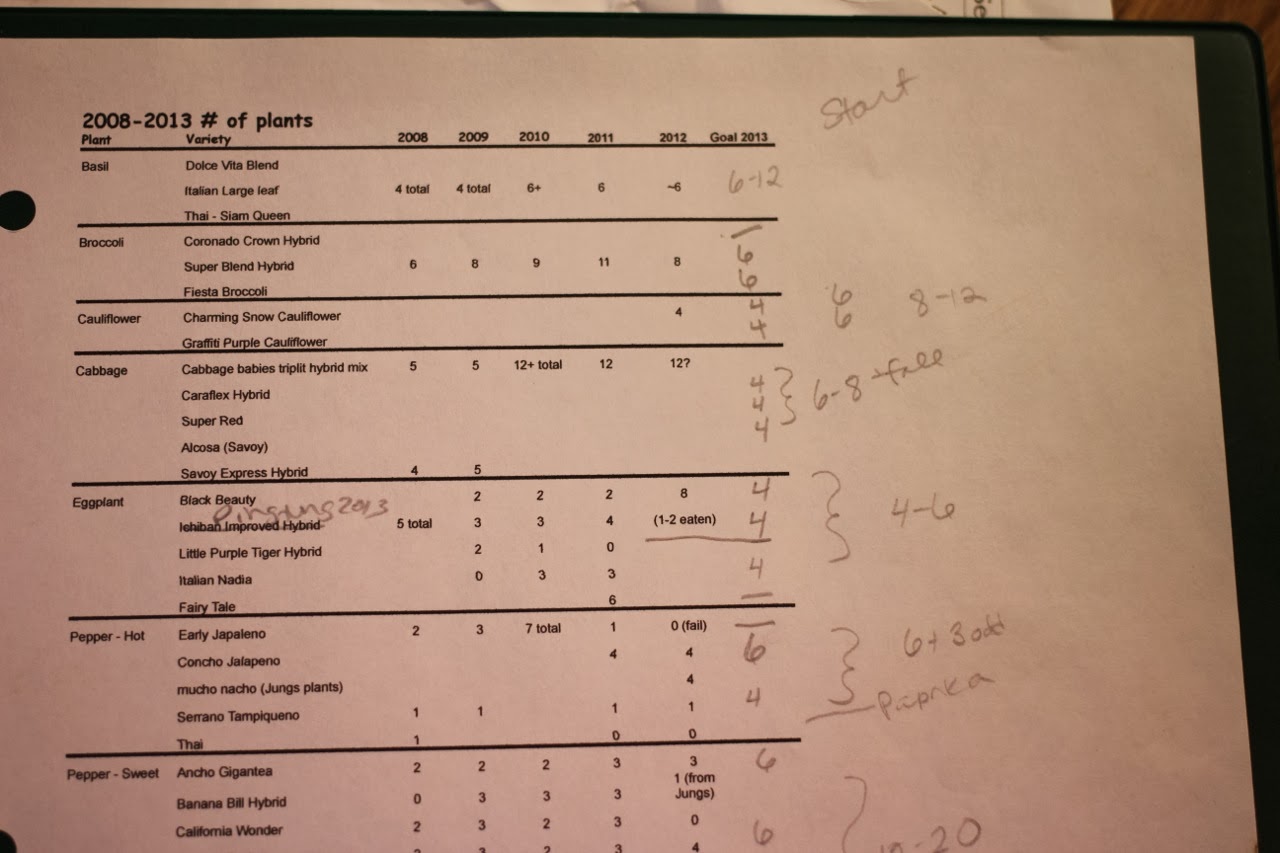
While it can be a little torturous to start thinking about preserving before your seeds have even sprouted, I find this is a good, realistic time of year to assess what you've been eating. At the beginning of winter, you are using up fresh stores, and possibly hoarding some of your more precious preserves. But by March, I think you have a better sense of what's left on your pantry shelves, and if those high summer ideas for meal plans are holding up in reality. Are you craving green vegetables on your plate, or are you happy with the starchy, rooty, carb-laden comfort foods of winter? Is your tomato shelf surprisingly full, or are you already skimping on opening jars of salsa?
So, back to the numbers game: how many seeds to start? My rule of thumb is 50-100% more than you want. For example, if I want 2 tomato plants of a specific variety, I start 3 or 4. That allows for a dud germination, plus a spare plant in case of calamity (death by frost/hail, or a being stepped on by a dog). I usually end up with a flat's worth of spare plants at the end of the planting season, but there are always friends/neighbors to share with, or a food pantry or community garden that would love to take them. It also lets you select the best/healthiest specimens to plant. If I have a notoriously poor germinator (for me, parsley) or older seeds, I will double-up on the seeding to make sure I have enough starts, you can always thin out your pots later.
And, just because it's freezing cold and snowy out, one last summertime photo to remind me what this is all about:

Seed Starting - Alliums
I used up my last storage onions last week. If I can't quite grow enough to last me until the next year's harvest (or chive season!), at least I can make it to the next year's sowing!I started growing onions from seed about 4 years ago. Previously I purchases bundles of plants from our local garden center, but decided I wanted the variety control and price savings of growing my own. Plus: they need starting 10-12 weeks before planting out, which satisfies my craving for growing, and keeps me occupied until I can start the fun crops later. Also, per my extension office*, onion sets (the little bulbs you see at groceries and seed stores in spring) are not as good to use:
Planting onion sets is not recommended for market-quality onions. Sets are the second year’s growth of storage varieties or multiplier onions and therefore tend to be less sweet than other onions. In addition, they may bolt or go to seed early.


Using three fingers as a "dibble", I poke 15 holes in each cell, and drop a seed or two in each. Allium seed does not keep well--especially hybrids--so if you are re-using last year's seeds it may pay to plant extra. You can always thin later. This year several of my (new) fedco packs were held over from last year, and they gave me extra, noting a 75% germination rate. So I double-seeded those quite a bit.
This is a little bit tedious, but three or four flats is a ton of onions (well--180 or so plants per flat!), and I can seed them all in less than an hour. If you were doing this commercially, it probably wouldn't be worth it, but at this scale I find it manageable. Onion sets can be $8-10 for 50-75 plants at our local garden center, and a seed pack (well more than a flat's worth) is less than $2! I label each flat with some masking tape, cover with a plastic lid or a bag to hold in moisture, and put them someplace relatively warm to germinate.
In around a week you'll start spotting seedlings, at which point move them under your lights.


Alliums don't like to dry out, so try and keep them evenly moist. I generally water from the bottom for these. After a few weeks you can feed with a mild organic fertilizer, or some compost tea.


There's some debate whether or not to trim plants to promote thicker stock. I've done it both ways. Mostly, I think trimming is useful if plants are getting leggy and tipping over, or they won't fit under the lights! Experiment a little and see what method you like. It definitely doesn't hurt to trim them. Our extension office recommends trimming to 5 inches at planting time, which encourages root establishment.
The reason I like this size flat insert is that when it comes time for planting, I just carefully tip one pack out at a time, and gently tease apart the plants--their roots will be intertwined but they are surprisingly cooperative to untangling. Individual plug cells were a total PITA to transplant (poking each cell from below with a pencil to get them out, arg!), and whole planted flats meant that I had to plant them all at once or have an awkward half-flat leftover.

*By the way, I've probably mentioned our University Extension office a lot in these last posts, they are an excellent resource. I find that publications aimed at market growers are super valuable for serious home gardeners, with a little adjustment for scale. There's an entire series of PDFs available for free on growing vegetables in Wisconsin, and much of what I've learned about Onions is from this one: http://learningstore.uwex.edu/assets/pdfs/A3785.PDF. They include information from seed starting through to harvest and storage, and are of course appropriate for Wisconsin climate/soil types.


