Showing posts with label learning from mistakes. Show all posts
Showing posts with label learning from mistakes. Show all posts
Fall garden cleanup pep talk
This is the lecture I've been giving myself the past week, and I figured I'm not the only one who needs it:
BUT
It is also okay to string a pet plant along, if you're inclined. If you have a full fridge and can't deal with processing the last picking of green beans, or if the forecast has a rogue hot spell after one cold night and you think you might get a few more jalapenos, go for it. Cover plants with remay, sheets, or tarps, and most things can survive the first couple of light frosts. My summer squash is miraculously healthy and plugging away at fruit (and I'm not tired of them yet!) and I think I"ll let that baby drag on until the final freeze.

Don't try to do everything at once. Just like in the spring, tackle a section or two at a time. I picked most of the remaining harvest last week, and tackled the aformentioned tomato vines; this afternoon I'm working on peppers and beans. Prioritize by what is the least cold hardy (BASIL) and what can stay standing long into winter (kale, broccoli, leeks).
BUT
Don't leave everything until next spring either! Leaving mildewy or diseased plants over the winter is just creating issues for the following season. Non-beneficial insects will overwinter there as well. Besides, cleanup and preparation makes getting started in the spring SO MUCH easier. Everybody hates weeding, especially with the rationale that the coming freeze will kill plants anyway, but a last pass in your gardens and paths will really pay dividends later on.

It's okay to not compost everything. Our city collects yard waste, and while I try and recycle most of my weeds and garden byproducts within my own property, some things just aren't worth it (for me). I send sickly tomato and potato vines to the curb for pickup, as well as woody stems and root balls that will have a hard time breaking down. This reduces the time it takes my compost to be ready to use, and also cuts back on introducing disease or weeds. While definitely having volunteers like dill or celery is the norm in my garden, unfriendlies such as stinging nettle are not welcome. Even plants I like that are aggressive (cleome!) will often get send to the city, whose composting volume is large and hot enough that they do a better job of killing seeds and fully composting woody stuff.
If you don't have this option but you have the space you might want to separate out the more difficult waste products and give them their own pile. As woodier bits break down you can introduce them to a future turn of the compost.
Speaking of which, fall is a great time to turn that big pile of compost. I mostly feed my beds in the fall. One reason for me is that I have chicken manure going into my bins, and depending on the timing or my skill at building a great compost pile--this may not be broken down thoroughly when it goes into my garden. Too-fresh manure can burn plants, and has the potential to transmit pathogens. While I don't have a lot of worries about catching anything nasty from my girls, the generally accepted practice is to wait 90 days after spreading fresh manure before harvesting (longer if the food is in contact with the soil). So for us Northern gardeners, this works out well for feeding beds in the fall anyway. If my compost isn't fully finished, a last sit in the garden over the winter helps break the remainder down, all the while sending nutrients into the soil below.
Putting gardens to bed: The last fall task for me is mulching with leaves and grass clippings. The final mows of the season are great for creating a lovely brown/green mix of mulch that can cover sleeping gardens and feed them all winter long, as well as protecting the soil from harsh conditions. If you're a planner and know where your earliest crops will be next season (onions, lettuces, peas etc) you can prep those beds thoroughly now, so they are ready to plant as soon as the ground is warm enough. No digging required, I often plant my onions right through the mulch. Actually the first planting will be this fall's garlic: so I clean up and feed that bed first so I can plant around Halloween, and mulch it super well with leaves/grass (and straw, if I have it).
Makes notes for next year. I definitely struggle with this,but it's the perfect time to reflect on what worked and what didn't, and what your goals are for next season. I think the hardest part of this is the natural let-down of the end of the season. As I work in my overgrown and weedy beds, I tend to only see the failures (how did I make so little pesto this year? Why were my peppers so non-prolific?) but sitting down with your spring notes/plans can help you gain a little perspective and remind you of what did work (what a great year for cauliflower, I had almost forgotten).
While most of this week I have just wished for it all to be done already, making plans to spend the last brisk sunny days putting my garden to bed for the winter is not the worse chore I can imagine. I can't wait to see the (mostly) neat beds ready to sleep away until spring.
A successful garlic experiment
Last year I was a wee bit short of garlic. I ended up with 80ish heads, when our goal is generally closer to 100+. I couple of things contributed to this--obviously I didn't quite plant enough bulbs--but also I had purchased a few "fancy" types from the market to diversify my crop a bit, and NONE of them survived the winter. Lesson learned. Also: our pickle production has been HUGE the last few years, and I forget how much garlic you use in every batch.There was a bit of hoarding and skimping of garlic over the winter--I had resigned myself for buying garlic for the first time in YEARS, but we actually made it thanks to a hefty load of scape pesto in the freezer. We limped along until this year's scape harvest, and I've been nicking a few baby green garlics out of the garden here and there.

Anyway, last fall's planting had a little more pressure to get it right. I had to walk a balance of saving enough for planting, and having enough to mostly get us through the winter. Then I had this idea. There was a "plant". A sort of chive, sort of not, at the end of one of my beds. I realized somewhere along the line it was a garlic that I had missed one year, and it just kept coming up, making tasty snippings for dinner, and then teeny tiny little scape heads in June. So I kept it, as kind of a volunteer pet plant (other people have these right? That weird arugula patch growing in your pepper patch you just can't stand to pull?

So last year, we revamped that little bed for strawberries, and I dug that sucker up. TONS and TONS of tiny garlc bulbs. I wish I had taken a picture. It was like a little garlic factory. SO, this was my secret weapon last fall. I planted half of my bed (about 75 bulbs) with big fat mature garlic from the last season's harvest. The second half was chock full of wee baby bulbs. I figured, at worst, they'd be tiny but edible, or I could replant them again and build them up to a larger size in a year or two.

And they've done fantastic. They've been noticeably shorter than the main crop, but I've pulled a few for fresh eating over the last few weeks and they are a nice size. Today I lifted them all out and they are awesome. I will definitely be integrating these little troopers into my main crop. It looks like I may have harvested them a little late so they may not store all winter, but I'll definitely hang onto a few to plant this fall. I should note my main crop is just selected from an unknown variety--probably organic grocery store garlic--and they are dependable if not exciting. I am happy to have these little red-skinned cuties to add to the mix.

I'm totally going to cultivate a few intentionally neglected plants in my herb bed from now on. It's the perfect fall-back garlic to cover for a poor year. Meanwhile my "main crop" doesn't seem quite ready. They still have 6 green leaves and are just turning brown at the tips, so I'm leaving the rest for another week or so.

8 weeks to frost - transplanting
Last week I seeded the brassicas: Broccoli, cabbage and cauliflower. These generally are advised to plant 6-8 weeks before setting out, but since most of these are fairly cold tolerant, that set-out date can be a little earlier than the average last frost. Depending on the forecast and how warm the soil is on a given year, I start thinking about setting cabbage and broccoli out in mid- to late-April, with the protection of row cover or a low tunnel. So I do start these on the early end of the range. Another good idea with these guys is staggering planting--start a few indoors early, seed a few outdoors later, and you'll extend your harvest.
On the schedule this week are the remaining peppers, and a few ornamental flowers. But, also on the agenda was transplanting some of my earlier starts:

But, if you need that plant (perhaps the cell next door had poor germination) or you just can't stand to kill an otherwise healthy seedling, here's how I transplant young plants. In my case, I have deliberately overseeded a few things to save some space under my lights during germination, and this week I was ready to move them into their future homes.

My tool of choice for this is a wooden skewer. I poke the blunt end under the chosen seedling, and gently lift until it is rising out of the pot with no resistance. Very gently, lift the plant by the stem, just under the leaves. If all goes well you'll have a barely disturbed baby root ball.


I remember last spring, when our magnolia bloomed early, that it was not really an entire month ahead, it was just that two weeks early, combined with the late spring of the previous year, made it seem extraordinary. And so this year the pendulum swings back.
If I hear one more person say (at the grocery store, at the bank teller) how it was EIGHTY degrees last year, as if that is the way it is supposed to be, I may have to throttle them, or at least gently remind them of our loss of fruit crops, and of drought. But I don't, as I too am wishing for some warmer days--though really, a rogue 55 degrees for a few hours would be fine. Above freezing for two days in a row? Okay I'll take that.

Last year's heat wave was freaky, and I had a growing sense of dread as it continued day after day. But then again, it's really hard not to enjoy sunshine and coatless temperatures. This cold streak is a little harder to bear, but it helps to commiserate with internet friends who are even colder, or who have a foot of snow! It's also nice to have the perspective from looking at my notes from year to year.
I knew last March that having the first year of winter gardening in the hoop house occur in such a non-winter would make it a little harder to apply the lessons I learned. I started a ton of flats (mostly alliums) with the thought that I could move them outside by now, but that's just not the case. My early greens are hardened off, but I even pulled them inside since our lows are below 10 degrees this week. (It would also probably help if my cold frame wasn't frozen to the ground--I normally move it close to the house and use it to extend my light space on sunny days, and this year I can't even get the lid open.)
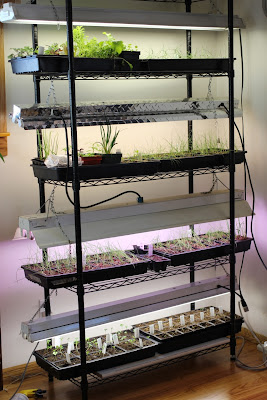
Oh well, I scrounged up extra lights from the basement, and have doubled my space inside, and will just try and hold on for another week or two!
And thank goodness the sun is out, there's always a heat wave in the hoop. I will head up the hill and spend some quality time soaking in some vitamin D in my wee Florida simulator.
 |
| On the first day of spring, a whole flock of robins showed up in the backyard, just to cheer me up. |
If I hear one more person say (at the grocery store, at the bank teller) how it was EIGHTY degrees last year, as if that is the way it is supposed to be, I may have to throttle them, or at least gently remind them of our loss of fruit crops, and of drought. But I don't, as I too am wishing for some warmer days--though really, a rogue 55 degrees for a few hours would be fine. Above freezing for two days in a row? Okay I'll take that.

Last year's heat wave was freaky, and I had a growing sense of dread as it continued day after day. But then again, it's really hard not to enjoy sunshine and coatless temperatures. This cold streak is a little harder to bear, but it helps to commiserate with internet friends who are even colder, or who have a foot of snow! It's also nice to have the perspective from looking at my notes from year to year.
I knew last March that having the first year of winter gardening in the hoop house occur in such a non-winter would make it a little harder to apply the lessons I learned. I started a ton of flats (mostly alliums) with the thought that I could move them outside by now, but that's just not the case. My early greens are hardened off, but I even pulled them inside since our lows are below 10 degrees this week. (It would also probably help if my cold frame wasn't frozen to the ground--I normally move it close to the house and use it to extend my light space on sunny days, and this year I can't even get the lid open.)

Oh well, I scrounged up extra lights from the basement, and have doubled my space inside, and will just try and hold on for another week or two!
 |
And thank goodness the sun is out, there's always a heat wave in the hoop. I will head up the hill and spend some quality time soaking in some vitamin D in my wee Florida simulator.
how to fix your yogurt
I've been making yogurt for a couple of years now, I think. I used El's method: heat milk to 180 cool to 116, add a tablespoon of yogurt and stick in a cooler with a jar of hot water for 8 hours. It worked. Every once in a while I'd get a runny batch, and once in a while I'd pick up a fresh culture (ie, storebought yogurt).For some reason, I had a string of bad batches lately. Everything was the same--equipment, temps, milk, culture (though I did try a new brand to see if that was the issue). Totally runny. Even straining it with a coffee filter had dismal results.
So after a bit of frustration (and one accidental batch of ricotta when I tried to experiment*), I finally remembered to turn to Sandor Katz and the Wild Fermentation book. Lots of good tips:
- Don't be tempted to add more culture to a batch thinking it will make it thicker. His explanation made sense to me from sourdough bread experience: You are aiming to achieve the perfect "population" of organisms to get the culture to your desired product. Too many good bacteria, too little food, and they will peak and start to die off, leaving their end products behind (in both cases, a sour watery-ness). His rule of thumb is 1 tablespoon per quart of milk.
- Longer is okay: 8 - 12 hours of culturing, even up to 18, is fine. I always worried about going longer, but its a range, really. You might get you some extra tang, but won't affect safety.
- Cooler is okay too--Katz's cooled temp (before adding the yogurt) is only 110 degrees. Obviously there is some flexibility to different recipes. So, like everything, find the method that works for you.
- Finally: He had tips for failed yogurt. One--let it go longer, after 8-12 hours, if not thick, add more hot water (to the cooler, or replace your jar of hot water with a fresh one) and let it sit another 4 hours or so. Two--add a little more culture, stir it gently, and let it sit (again, check after 4 hours or so).
 |
| fresh raspberries for breakfast in nearly-November are a treat! |
So what worked for me? A little of everything. I started cooling my milk to 110. My first new batch was still watery after 8 hours, I panicked and added more culture AND more hot water and let it go another 5-6 hours. PERFECT. The next batch, I checked after 8 hours (pretty watery), then replaced the hot jar of water and let it go another 4. Perfect. This last bach: I just let it go 12 hours without disturbing, and it came out just fine. Yay!
I don't know what changed for me, I am tempted to ask the smallish dairy that I get milk from if they had any changes--bad hay year, different feed, lots of young cows? (That's the nice thing about using a local producer, I know the milk I'm getting is only from 2 farms, not hundreds!). But for whatever reason, a longer fermentation period seems to be what I need.
* Oh, and as for the ricotta, learn from my mistake and don't re-heat your failed yogurt thinking you can start again. Reheated acidified milk is how you make cheese! I'm not really a cheesemaker, but I've dabbled, and I realized once the curds formed what had happened. I strained off the whey and voila! Creamy ricotta! Another good way to use up a failed batch of yogurt besides muffins and biscuits!


